How to Install Apache CouchDB on Ubuntu 16.04 or 18.04
This post will guide you how to install Apache CouchDB on your Ubuntu Linux 18.04 or 16.04. How do I configure Apache Couch DB HTTP Server on your Ubuntu system. How do I configure the Admin User, and create an CouchDB database on your CouchDB Server.
- What is Apache Couch DB?
- Prerequistes
- Enable CouchDB Repository
- Installing Apache CouchDB
- Verifying Apache CouchDB
- Creating Database in CouchDB
- Listing All Databases in CouchDB

What is Apache Couch DB?
CouchDB is an Apache Software Foundation project, and it is an open source NoSQL database software. And it do not have any tables, rows, or index, etc. CouchDB uses JSON for data storage, JavaScript for MapReduce indexes, and regular HTTP for its API.
Apache Couch DB provide a Web console to allow you to access and manage Apache CouchDB databases from a web browser via HTTP protocol. And you can also create, read, update, and delete database documents through RESTful HTTP API.
CouchDB database management system can be work with all IT environments, distributed server clusters, the latest web browsers and mobile applications. And it is compatible with Couch Replication Protocol inlucdes PouchDB, Cloudant and Couchbase Lite.
CouchDB has a document that oriented NoSQL database architecture and is implemented in the concurrency that oriented language Erlang.
Prerequistes
- Before you get started with this post, and you need to have a non-root user with sudo privileges so that you can update or install packages under Ubuntu system.
- Before you begin, you also need to update the package index and all installed packages to the latest version on your Ubuntu system with the following steps:
$ sudo apt update
$ sudo apt upgrade
Enable CouchDB Repository
Before you install CouchDB, you need to add Apache CouchDB repository to your Ubuntu system, and you need to add the repository key firstly, and then add the CouchDB repository.
If curl tool is not installed on your Ubuntu system, just install it firstly with the following apt command:
$ sudo apt install curl
Then you can begin to add the repository key and CouchDB repository with the following commands:
$ curl -L https://couchdb.apache.org/repo/bintray-pubkey.asc | sudo apt-key add -
$ echo "deb https://apache.bintray.com/couchdb-deb bionic main" | sudo tee -a /etc/apt/sources.list
If you are using Ubuntu 16.4, just run the following two command to add CouchDB repository, type:
$ curl -L https://couchdb.apache.org/repo/bintray-pubkey.asc | sudo apt-key add -
$ echo "deb https://apache.bintray.com/couchdb-deb xenial main" \ | sudo tee -a /etc/apt/sources.list
Outputs:
devops@devops:~$ sudo apt install curl
[sudo] password for devops:
Reading package lists... Done
Building dependency tree
Reading state information... Done
The following NEW packages will be installed:
curl
0 upgraded, 1 newly installed, 0 to remove and 112 not upgraded.
Need to get 159 kB of archives.
After this operation, 395 kB of additional disk space will be used.
Get:1 http://mirrors.aliyun.com/ubuntu bionic-security/main amd64 curl amd64 7.58.0-2ubuntu3.7 [159 kB]
Fetched 159 kB in 0s (629 kB/s)
Selecting previously unselected package curl.
(Reading database ... 177707 files and directories currently installed.)
Preparing to unpack .../curl_7.58.0-2ubuntu3.7_amd64.deb ...
Unpacking curl (7.58.0-2ubuntu3.7) ...
Setting up curl (7.58.0-2ubuntu3.7) ...
Processing triggers for man-db (2.8.3-2ubuntu0.1) ...
devops@devops:~$ curl -L https://couchdb.apache.org/repo/bintray-pubkey.asc | sudo apt-key add -
% Total % Received % Xferd Average Speed Time Time Time Current
Dload Upload Total Spent Left Speed
100 3100 100 3100 0 0 2553 0 0:00:01 0:00:01 --:--:-- 2555
OK
devops@devops:~$ echo "deb https://apache.bintray.com/couchdb-deb bionic main" | sudo tee -a /etc/apt/sources.list
deb https://apache.bintray.com/couchdb-deb bionic main
devops@devops:~$
Installing Apache CouchDB
Once Apache CouchDB repository is added into your default APT respotiroy, you can install the latest Apache CouchDB packages with the following command:
$ sudo apt install couchdb
During the installation of CouchDB, you will be asked to select the CouchDB server configuration type. If you want to install the CouchDB in a standalone server, just select standalone option and click OK to continue.
─┤ Configuring couchdb ├──────────────────────────┐
 │                                                                           │
 │ Please select the CouchDB server configuration type that best meets your
 │ needs.
 │
 │ For single-server configurations, select standalone mode. This will set
 │ up CouchDB to run as a single server.
 │
 │ For clustered configuration, select clustered mode. This will prompt for
 │ additional parameters required to configure CouchDB in a clustered
 │ configuration.
 │
 │ If you prefer to configure CouchDB yourself, select none. You will then
 │ need to edit /opt/couchdb/etc/vm.args and /opt/couchdb/etc/local.d/*.ini
 │ yourself. Be aware that this will bypass *all* configuration steps,
 │ including setup of a CouchDB admin user - leaving CouchDB in "admin
 │
 │                                <Ok>
 │                                                                           │
 └───────────────────────────────────────────────────────────────────────────┘
Next, you need to set the IP address of the network interface on which the CouchDB node will bind to. If your CouchDB server is in standalone mode, and you just need to set the default IP address 127.0.0.1. and if you are in a cluster mode, you can set the IP address as 0.0.0.0, it means that CouchDB node bind to all network interfaces.
┌─────────────────────────┤ Configuring couchdb ├──────────────────────────┐
│ A CouchDB node must bind to a specific network interface. This is done │
│ via IP address. Only a single address is supported at this time. │
│ │
│ The special value '0.0.0.0' binds CouchDB to all network interfaces. │
│ │
│ The default is 127.0.0.1 (loopback) for standalone nodes, and 0.0.0.0 │
│ (all interfaces) for clustered nodes. In clustered mode, it is not │
│ allowed to bind to 127.0.0.1. │
│ │
│ CouchDB interface bind address: │
│ │
│ 127.0.0.1_______________________________________________________________ │
│ │
│ │
│ │
└──────────────────────────────────────────────────────────────────────────┘
On the next prompt, you need to type and confirm the admin password, then the CouchDB installation will continue.
┌───────────────────────────────────────────────────────────────────────┤ Configuring couchdb ├───────────────────────────────────────────────────────────────────────┐
│ It is highly recommended that you create a CouchDB admin user, which takes CouchDB out of the insecure "admin party" mode. Entering a password here will take care │
│ of this step for you. │
│ │
│ If this field is left blank, an admin user will not be created. │
│ │
│ A pre-existing admin user will not be overwritten by this package. │
│ │
│ Password for the CouchDB "admin" user: │
│ │******
│ ___________________________________________________________________________________________________________________________________________________________________ │
│ │
│ │
│ │
└─────────────────────────────────────────────────────────────────────────────────────────────────────────────────────────────────────────────────────────────────────
After installation is completed, and you can use the following command to start and enable CouchDB service.
$ sudo systemctl start couchdb.service
$ sudo systemctl enable couchdb.service
Let’s check the current status of CouchDB service with the command below:
$ systemctl status couchdb.service
Outputs:
devops@devops:~$ systemctl status couchdb.service
couchdb.service - Apache CouchDB
Loaded: loaded (/lib/systemd/system/couchdb.service; enabled; vendor preset: enabled)
Active: active (running) since Fri 2019-08-02 06:43:26 EDT; 2min 14s ago
Main PID: 10617 (beam.smp)
Tasks: 26 (limit: 1129)
CGroup: /system.slice/couchdb.service
├─10617 /opt/couchdb/bin/../erts-8.3.5.4/bin/beam.smp -K true -A 16 -Bd -- -root /opt/couchdb/bin/.. -progname couchdb -- -home /opt/couchdb -- -boot /opt/couc
├─10627 /opt/couchdb/bin/../erts-8.3.5.4/bin/epmd -daemon
├─10646 erl_child_setup 1024
├─10665 sh -s disksup
├─10670 /opt/couchdb/bin/../lib/os_mon-2.4.2/priv/bin/memsup
└─10671 /opt/couchdb/bin/../lib/os_mon-2.4.2/priv/bin/cpu_sup

Aug 02 06:43:26 devops systemd[1]: Started Apache CouchDB.
If you get the Active state from the outputs, it indicates that Apache CouchDB service has been installed and started on your Ubuntu or Debian Linux server.
Verifying Apache CouchDB
After installing CouchDB package on your Ubuntu system, you can verify if the installation has completed successfully by running the following curl command, and it will print the CouchDB database information in JSON format:
$ curl http://127.0.0.1:5984/
Outputs:
devops@devops:~$ curl http://127.0.0.1:5984/
{"couchdb":"Welcome","version":"2.3.1","git_sha":"c298091a4","uuid":"61a23751219d431fee6eb6950ce380d0","features":["pluggable-storage-engines","scheduler"],"vendor":{"name":"The Apache Software Foundation"}}
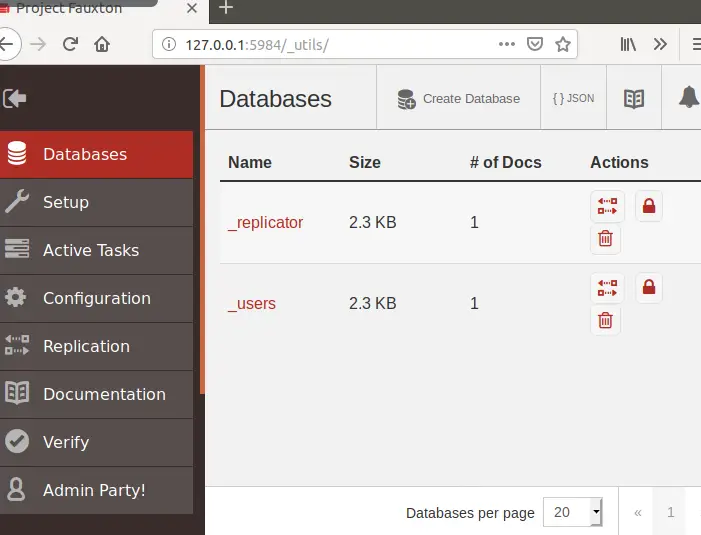
You can also go to a web browser and enter the following URL to access Apache CouchDB web Page:
http://127.0.0.1:5984/_utils/
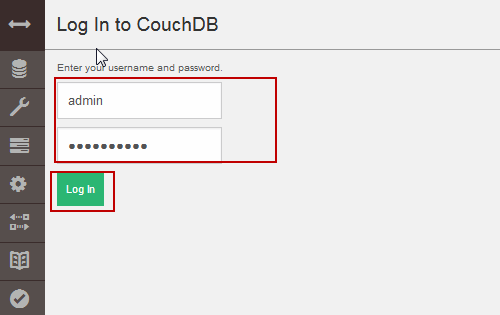
If you set the password for your CouchDB admin user, and then You need to enter your username and password to log in to CouchDB server. Then click Log in button.
Creating Database in CouchDB
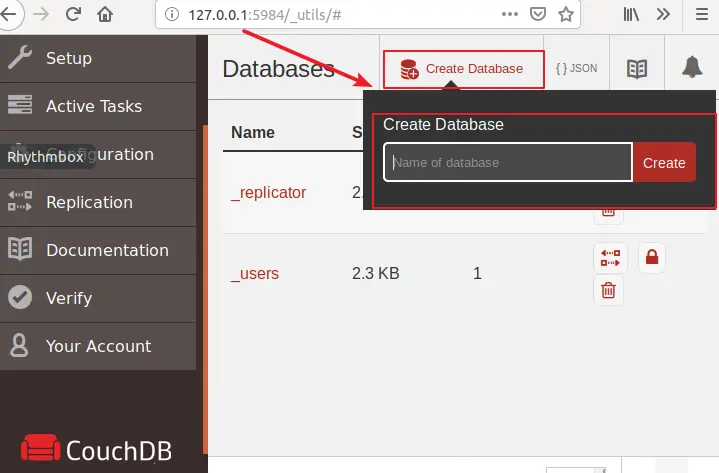
To create a new database in your CouchDB server, you can use Curl command with PUT subcommand and –X option. Or you can directly go to Web GUI of CouchDB to create new database.
For example, you wish to create a new database called testdb, just type:
$ curl -X PUT http://admin:admin@127.0.0.1:5984/testdb
Outputs:
devops@devops:~$ curl -X PUT http://admin:admin@127.0.0.1:5984/testdb
{"ok":true}
You can also create database through CouchDB Web GUI:
Listing All Databases in CouchDB
If you want to list all databases in your current CouchDB server, just use curl command with GET subcommand and -X option to get it, type:
$ curl -X GET http:// admin:admin @127.0.0.1:5984/_all_dbs
Outputs:
devops@devops:~$ curl -X GET http://admin:admin@127.0.0.1:5984/_all_dbs
["_replicator","_users","testdb"]
Conclusion
You should know that how to install and Configure Apache CouchDB on your Ubuntu or Debian Linux. If you want to see more information about CouchDB, you can go the official web page of Apache CouchDB directly.