How to Install WordPress on Ubuntu 16.04 or 18.04
This post will guide you how to install WordPress Content Management system on your Ubuntu Linux 18.04 or 16.04. How do I install WordPress with Apache on your Ubuntu Linux system.
- What is WordPress?
- Prerequisites
- Step1: Installing Apache
- Step2: Configuring Apache
- Step3: Installing PHP
- Step4: Installing MySQL or MariaDB
- Step5: Create Database and User
- Step6: Downloading WordPress
- Step7: installing WordPress
What is WordPress?
WordPress is a content management system based on PHP and MySQL that is usually used with the MySQL or MariaDB database servers but can also use the SQLite database engine. Features include a plugin architecture and a template system. It is most associated with blogging but supports other types of web content including more traditional mailing lists and forums, media galleries, and online stores. Used by more than 60 million websites, including 33.6% of the top 10 million websites as of April 2019, WordPress is the most popular website management system in use.

Prerequisites
- A running Ubuntu Linux system or VM
- You need to have a non-root user with sudo privileges
- A FQDN Domain name that point to your IP address. Such as: mytest.com
Step1: Installing Apache
You need to make sure that your system is up to data, so you can run apt update command to update the APT cache and upgrade all packages that can be updated. Type:
$ sudo apt update
$ sudo apt upgrade
Then you can begin to install Apache server package with the following command:
$ sudo apt-get install apache2 libapache2-mod-php
Outputs:
devops@devops:~$ sudo apt-get install apache2 libapache2-mod-php
[sudo] password for devops:
Reading package lists... Done
Building dependency tree
Reading state information... Done
The following packages were automatically installed and are no longer required:
linux-headers-4.18.0-22 linux-headers-4.18.0-22-generic
linux-image-4.18.0-22-generic linux-modules-4.18.0-22-generic
linux-modules-extra-4.18.0-22-generic
Use 'sudo apt autoremove' to remove them.
The following additional packages will be installed:
apache2-bin apache2-data apache2-utils
Suggested packages:
apache2-doc apache2-suexec-pristine | apache2-suexec-custom
The following NEW packages will be installed:
libapache2-mod-php
The following packages will be upgraded:
apache2 apache2-bin apache2-data apache2-utils
4 upgraded, 1 newly installed, 0 to remove and 56 not upgraded.
Need to get 1,413 kB of archives.
After this operation, 16.4 kB of additional disk space will be used.
Do you want to continue? [Y/n]
…..

Setting up libapache2-mod-php (1:7.2+60ubuntu1) ...
Processing triggers for ureadahead (0.100.0-21) ...
Setting up apache2-utils (2.4.29-1ubuntu4.7) ...
Setting up apache2-bin (2.4.29-1ubuntu4.7) ...
Setting up apache2-data (2.4.29-1ubuntu4.7) ...
Processing triggers for systemd (237-3ubuntu10.23) ...
Processing triggers for man-db (2.8.3-2ubuntu0.1) ...
Setting up apache2 (2.4.29-1ubuntu4.7) ...
Step2: Configuring Apache
Once Apache package is installed on your system, you need to create a basic configuration file for Apache, and it will set DocumentRoot variable to specify the location of your website files and set ServerName variable to specify what you domain name is. And you can create it by copying a default config file, and then modify it. Just do the following steps:
1# Run the following command to copy the default config file to use it as a template.
$ sudo cp /etc/apache2/sites-available/000-default.conf /etc/apache2/sites-available/mytest.com.conf
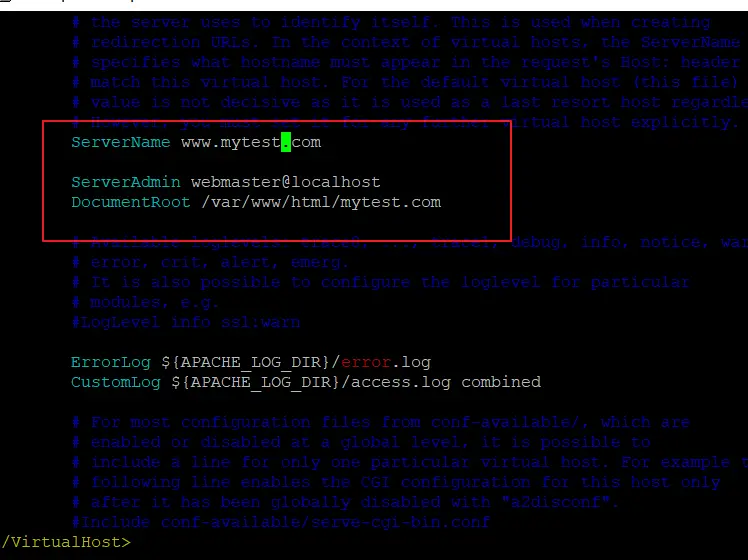
2# edit the configuration file mytest.com.conf with vim text editor, and uncomment the ServerName line, and replace example.com with you domain name, and then update the remain lines as below:
$ sudo vim /etc/apache2/sites-available/mytest.com.conf
ServerName mytest.com
ServerAdmin test@mytest.com
Documentroot /var/www/html/mytest.com

AllowOverride All
3# you need to create the directory to store your website files with the following mkdir command:
$ sudo mkdir /var/www/html/mytest.com
4# you need to disable the default configuration file and enable the newly created one, mytest.com.conf, run the below command:
$ sudo a2dissite 000-default.conf
$ sudo a2ensite mytest.com.conf
Outputs:
devops@devops:~$ sudo a2dissite 000-default.conf
Site 000-default disabled.
To activate the new configuration, you need to run:
systemctl reload apache2

devops@devops:~$ sudo a2ensite mytest.com.conf
Enabling site mytest.com.
To activate the new configuration, you need to run:
systemctl reload apache2
5# you also need to enable the mod_rewrite Apache module for WordPress with the following command:
$ sudo a2enmod rewrite
6# need to restart Apache service with the following command:
$ sudo systemctl restart apache2.service
Step3: Installing PHP
You need to install PHP and all required PHP extensions by running the following command:
$ sudo apt install php libapache2-mod-php
$ sudo apt install php7.2-common php7.2-cli php7.2-fpm php7.2-opcache php7.2-gd php7.2-mysql php7.2-curl php7.2-intl php7.2-xsl php7.2-mbstring php7.2-zip php7.2-bcmath php7.2-soap
Outpus:
devops@devops:~$ sudo apt install php libapache2-mod-php
[sudo] password for devops:
Reading package lists... Done
Building dependency tree
Reading state information... Done
libapache2-mod-php is already the newest version (1:7.2+60ubuntu1).
The following packages were automatically installed and are no longer required:
linux-headers-4.18.0-22 linux-headers-4.18.0-22-generic linux-image-4.18.0-22-generic linux-modules-4.18.0-22-generic linux-modules-extra-4.18.0-22-generic
Use 'sudo apt autoremove' to remove them.
The following NEW packages will be installed:
php
0 upgraded, 1 newly installed, 0 to remove and 56 not upgraded.
Need to get 3,084 B of archives.
After this operation, 12.3 kB of additional disk space will be used.
Do you want to continue? [Y/n] y
Get:1 http://mirrors.aliyun.com/ubuntu bionic/main amd64 php all 1:7.2+60ubuntu1 [3,084 B]
Fetched 3,084 B in 0s (14.6 kB/s)
Selecting previously unselected package php.
(Reading database ... 210189 files and directories currently installed.)
Preparing to unpack .../php_1%3a7.2+60ubuntu1_all.deb ...
Unpacking php (1:7.2+60ubuntu1) ...
Setting up php (1:7.2+60ubuntu1) ...

devops@devops:~$ sudo apt install php7.2-common php7.2-cli php7.2-fpm php7.2-opcache php7.2-gd php7.2-mysql php7.2-curl php7.2-intl php7.2-xsl php7.2-mbstring php7.2-zip php7.2-bcmath php7.2-soap
Reading package lists... Done
Building dependency tree
Reading state information... Done
php7.2-cli is already the newest version (7.2.19-0ubuntu0.18.04.1).
php7.2-common is already the newest version (7.2.19-0ubuntu0.18.04.1).
php7.2-common set to manually installed.
php7.2-curl is already the newest version (7.2.19-0ubuntu0.18.04.1).
php7.2-gd is already the newest version (7.2.19-0ubuntu0.18.04.1).
php7.2-mysql is already the newest version (7.2.19-0ubuntu0.18.04.1).
php7.2-opcache is already the newest version (7.2.19-0ubuntu0.18.04.1).
php7.2-intl is already the newest version (7.2.19-0ubuntu0.18.04.1).
php7.2-mbstring is already the newest version (7.2.19-0ubuntu0.18.04.1).
php7.2-zip is already the newest version (7.2.19-0ubuntu0.18.04.1).
The following packages were automatically installed and are no longer required:
linux-headers-4.18.0-22 linux-headers-4.18.0-22-generic linux-image-4.18.0-22-generic linux-modules-4.18.0-22-generic linux-modules-extra-4.18.0-22-generic
Use 'sudo apt autoremove' to remove them.
Suggested packages:
php-pear
The following NEW packages will be installed:
php7.2-bcmath php7.2-fpm php7.2-soap php7.2-xsl
0 upgraded, 4 newly installed, 0 to remove and 56 not upgraded.
Need to get 1,550 kB of archives.
After this operation, 5,456 kB of additional disk space will be used.
Do you want to continue? [Y/n]
Step4: Installing MySQL or MariaDB
Now you can begin to install MySQL database management or MariaDB database to store data for your WordPress site. Just run the following command to install it:
$ sudo apt install mariadb-server
Or
$ sudo apt install mysql-server mysql-client
Once the installation is completed, you’d better to run mysq_secure_installation script to secure your MySQL or MariaDB installation by running the following command:
$ sudo mysql_secure_installation
Step5: Creating Database and user
You need to create a database for your WordPress site, and create one MySQL user.
Firstly, you need to log in to your MySQL shell by issue the following command:
$ sudo mysql -u root -p
Then run the following SQL statement to create a new database called mywordpress in the MySQL Shell prompt:
Mysql> create database mywordpress;
Outputs:
mysql> create database mywordpress;
Query OK, 1 row affected (0.00 sec)
Next, you need to create a MySQL username called mypres and you also need to grant the necessary permissions to this user account, just issue the following MySQL commands:
Mysq> create user 'mypres'@'localhost' identified by 'password';
Mysql> grant all on mywordpress.* to 'mypres'@'localhost';
Mysql> flush privileges;
Mysql> exit;
Outputs:
mysql> create user 'mypres'@'localhost' identified by 'password';
Query OK, 0 rows affected (0.00 sec)

mysql> grant all on mywordpress.* to 'mypres'@'localhost';
Query OK, 0 rows affected (0.00 sec)

mysql> flush privileges;
Query OK, 0 rows affected (0.01 sec)
Step6: Downloading WordPress
Now you can download the latest version of WordPress from its official web site by the following wget command. At this time of writing this post, the latest version of WordPress is 5.2.2.
$ wget https://wordpress.org/latest.zip
Outputs:
devops@devops:~$ wget https://WordPress.org/latest.zip
--2019-09-02 21:51:12-- https://WordPress.org/latest.zip
Resolving WordPress.org (WordPress.org)... 198.143.164.252
Connecting to WordPress.org (WordPress.org)|198.143.164.252|:443... connected.
HTTP request sent, awaiting response... 200 OK
Length: 12121295 (12M) [application/zip]
Saving to: ‘latest.zip’

latest.zip 100%[===================>] 11.56M 2.35MB/s in 4.9s

2019-09-02 21:51:23 (2.35 MB/s) - ‘latest.zip’ saved [12121295/12121295]
Once the download is completd, and you need to extract the archive file into Apache2 root directory /var/www/html, type:
$ unzip latest.zip
$ sudo mv WordPress/* /var/www/html/mytest.com
You still need to set the correct permissions for your Apache root directory using the following command:
$ sudo chown -R www-data:www-data /var/www/html/mytest.com/
$ sudo chmod -R 755 /var/www/html/mytest.com/
Step7: installing WordPress
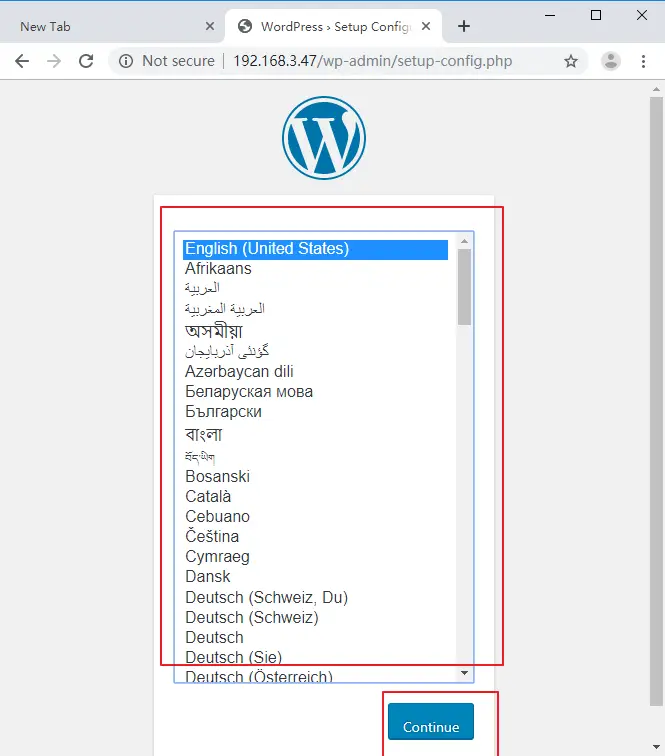
You need to open your browser and type the following URL link to install WordPress:
http://mytest.com/wp-admin/install.php
or
http://IP_ADDRESS/wp-admin/install.php
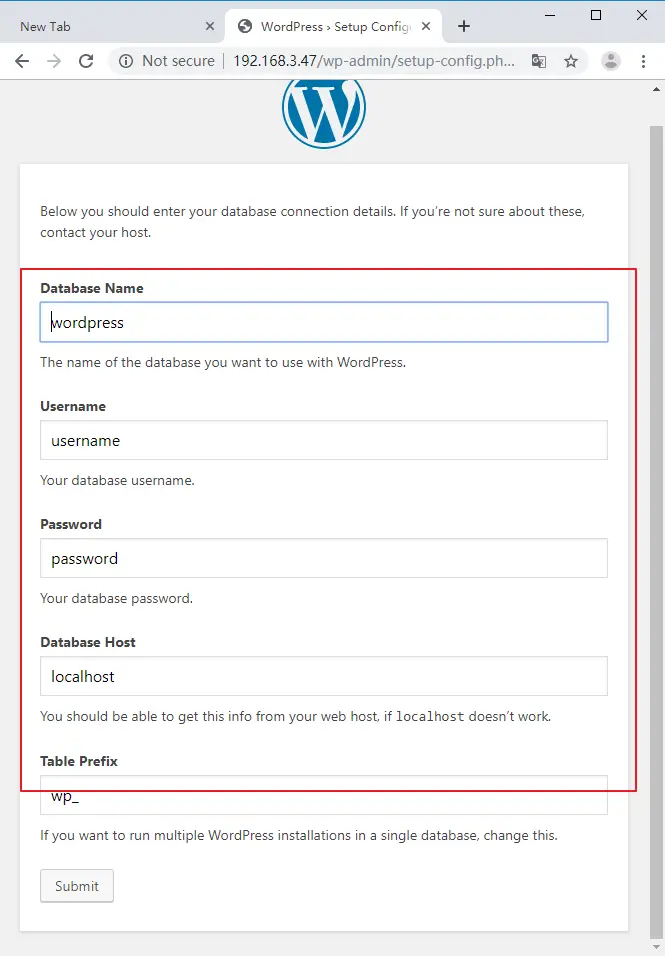
Then you need to enter the database information so that the installation can continue. Click Submit button.
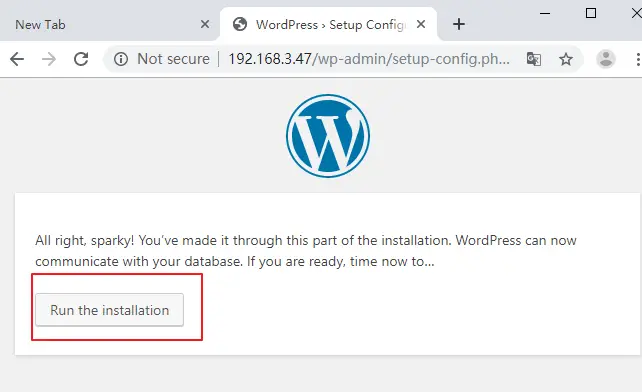
If WordPress can now communicate with your database, and you now can click on Run the installation button to install it.
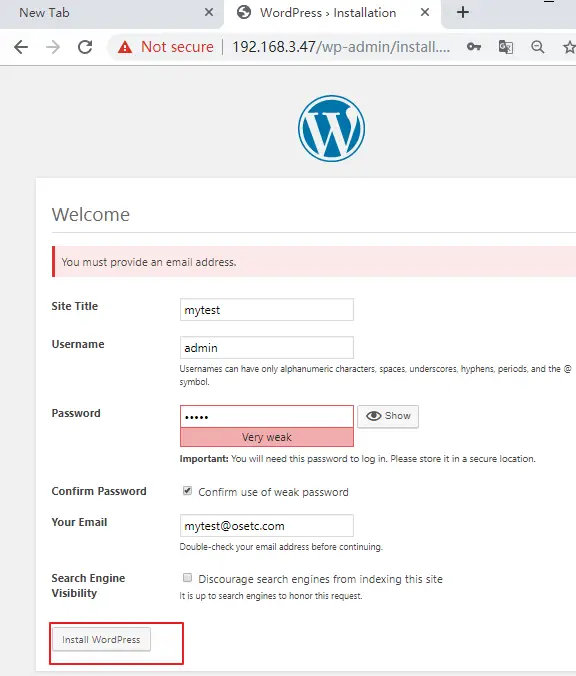
You need to provide the site information, such as: Site Title, Username, Password, etc. click on Install WordPress button.
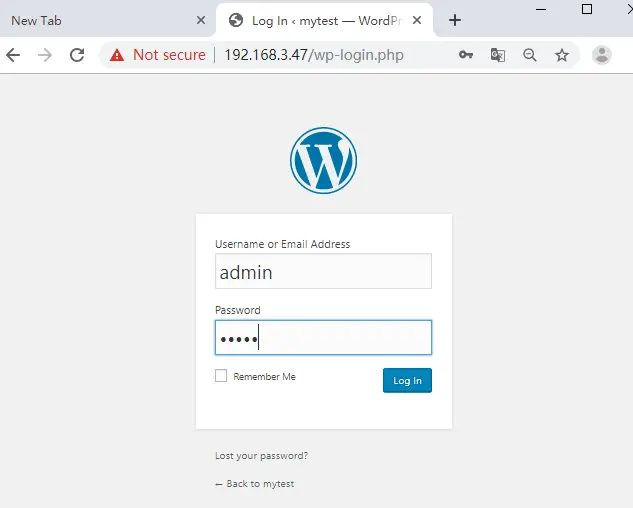
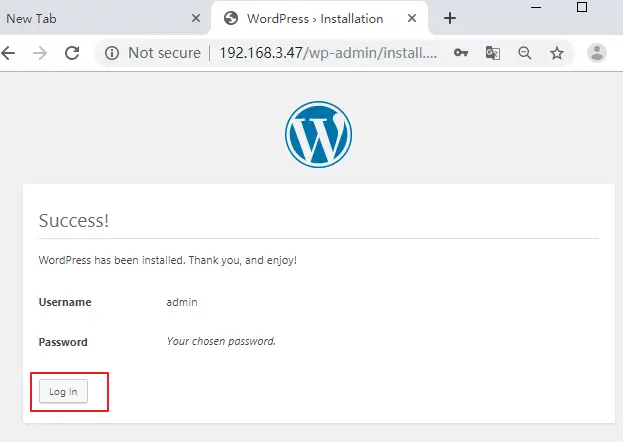
Now WordPress should be installed on your Ubuntu system. and you can log in it by clicking on Log In button.

Conclusion
You should know that how to install WordPress tool on your Ubuntu or Debian Linux. If you want to see more detailed information about postman, you can directly go to its official web site.