How to Install and Use PHP Composer on Ubuntu 16.04/18.04 Linux
This post will guide you how to install PHP Composer on your Ubuntu Linux server. How do I use Composer Tool to download and install all the required PHP packages on your project on Ubuntu Linux 16.04/18.04.
- What is PHP Composer?
- System Requirements
- Installing Composer
- Installing Dependencies using Composer
- Updating Dependencies using Composer
- Autoloading Libraies
What is PHP Composer?
Composer is a dependency management tool for PHP. And it is not a package manager tool, and it only install and manage dependency packages for your PHP project. it does not install the requested packages gobally, and just installing them in a directory called vendor inside your project. you can use Composer tool to find out which version of which packages can and need to be installed, and then installs or downloads them into your project. So we do not need to searh for each packages to install. It is similar to NPM for Nodejs and bundle for Ruby.

System Requirements
- Composer requires PHP 5.3.2 + to be installed on your Ubuntu system.
- Non-root user with sudo privilege
Installing PHP Composer
To install PHP composer on your Ubuntu system, just do the following steps:
#1 you need to update the default repository cache with the following command:
$ sudo apt update
#2 you need to install the dependency packages, For example, you need to use curl tool to download the installation packge of composer, and two php-related packages (php-cli and php-mbstring) used to provide functions for a library that you will be using. You also need to install git tootl to download dependencies by composer. need to install unzip tool to extract zipped packages. To install those dependency packages on your Ubuntu system, just run the following command:
$ sudo apt install curl php-cli php-mbstring git unzip
Outputs:
root@devops:~# sudo apt install curl php-cli php-mbstring git unzip
Reading package lists... Done
Building dependency tree
Reading state information... Done
unzip is already the newest version (6.0-21ubuntu1).
curl is already the newest version (7.58.0-2ubuntu3.6).
The following packages were automatically installed and are no longer required:
augeas-lenses cpu-checker cryptsetup cryptsetup-bin db-util db5.3-util
dmeventd extlinux hfsplus ibverbs-providers icoutils ipxe-qemu
ipxe-qemu-256k-compat-efi-roms ldmtool libafflib0v5 libaio1 libaugeas0
libbfio1 libcacard0 libconfig9 libdate-manip-perl libdevmapper-event1.02.1
libewf2 libfdt1 libhfsp0 libhivex0 libibverbs1 libintl-perl libintl-xs-perl
libiscsi7 libldm-1.0-0 liblvm2app2.2 liblvm2cmd2.02 libnl-route-3-200
librados2 librbd1 librdmacm1 libsdl1.2debian libspice-server1
libstring-shellquote-perl libsys-virt-perl libtsk13 libusbredirparser1
libvirt0 libwin-hivex-perl libxen-4.9 libxenstore3.0
linux-headers-generic-hwe-16.04 linux-image-generic-hwe-16.04 lsscsi lvm2
msr-tools osinfo-db qemu-block-extra qemu-system-common qemu-system-x86
qemu-utils scrub seabios sgabios sleuthkit supermin zerofree
Use 'sudo apt autoremove' to remove them.
The following additional packages will be installed:
git-man liberror-perl php7.2-cli php7.2-json php7.2-mbstring php7.2-opcache
php7.2-readline
Suggested packages:
git-daemon-run | git-daemon-sysvinit git-doc git-el git-email git-gui gitk
gitweb git-cvs git-mediawiki git-svn php-pear
The following NEW packages will be installed:
git git-man liberror-perl php-cli php-mbstring php7.2-cli php7.2-json
php7.2-mbstring php7.2-opcache php7.2-readline
0 upgraded, 10 newly installed, 0 to remove and 72 not upgraded.
Need to get 6,826 kB of archives.
After this operation, 41.2 MB of additional disk space will be used.
Do you want to continue? [Y/n] Y

......
Setting up php7.2-opcache (7.2.15-0ubuntu0.18.04.1) ...

Creating config file /etc/php/7.2/mods-available/opcache.ini with new version
Setting up php7.2-cli (7.2.15-0ubuntu0.18.04.1) ...
update-alternatives: using /usr/bin/php7.2 to provide /usr/bin/php (php) in auto mode
update-alternatives: using /usr/bin/phar7.2 to provide /usr/bin/phar (phar) in auto mode
update-alternatives: using /usr/bin/phar.phar7.2 to provide /usr/bin/phar.phar (phar.phar) in auto mode

Creating config file /etc/php/7.2/cli/php.ini with new version
php_invoke: Enabled module ftp for cli sapi
php_invoke: Enabled module shmop for cli sapi
php_invoke: Enabled module tokenizer for cli sapi
php_invoke: Enabled module iconv for cli sapi
php_invoke: Enabled module fileinfo for cli sapi
php_invoke: Enabled module sysvmsg for cli sapi
php_invoke: Enabled module sockets for cli sapi
php_invoke: Enabled module sysvsem for cli sapi
php_invoke: Enabled module pdo for cli sapi
php_invoke: Enabled module phar for cli sapi
php_invoke: Enabled module posix for cli sapi
php_invoke: Enabled module curl for cli sapi
php_invoke: Enabled module calendar for cli sapi
php_invoke: Enabled module exif for cli sapi
php_invoke: Enabled module ctype for cli sapi
php_invoke: Enabled module gettext for cli sapi
php_invoke: Enabled module sysvshm for cli sapi
Setting up php-cli (1:7.2+60ubuntu1) ...
After installed the above packages, you can try to run the following commands to check if those packages are installed normally, type:
$ php --version

$ curl --version

$ git --version

$ unzip --version
Outputs:
root@devops:~# php --version
PHP 7.2.15-0ubuntu0.18.04.1 (cli) (built: Feb 8 2019 14:54:22) ( NTS )
Copyright (c) 1997-2018 The PHP Group
Zend Engine v3.2.0, Copyright (c) 1998-2018 Zend Technologies
with Zend OPcache v7.2.15-0ubuntu0.18.04.1, Copyright (c) 1999-2018, by Zend Technologies

root@devops:~# curl --version
curl 7.58.0 (x86_64-pc-linux-gnu) libcurl/7.58.0 OpenSSL/1.1.0g zlib/1.2.11 libidn2/2.0.4 libpsl/0.19.1 (+libidn2/2.0.4) nghttp2/1.30.0 librtmp/2.3
Release-Date: 2018-01-24
Protocols: dict file ftp ftps gopher http https imap imaps ldap ldaps pop3 pop3s rtmp rtsp smb smbs smtp smtps telnet tftp
Features: AsynchDNS IDN IPv6 Largefile GSS-API Kerberos SPNEGO NTLM NTLM_WB SSL libz TLS-SRP HTTP2 UnixSockets HTTPS-proxy PSL

root@devops:~# git --version
git version 2.17.1

root@devops:~# unzip --version
caution: both -n and -o specified; ignoring -o
UnZip 6.00 of 20 April 2009, by Debian. Original by Info-ZIP.
#3 you can start to download the Composer installer file to the current directory with one of the following curl command or php command on your Ubuntu system:
$ curl -sS https://getcomposer.org/installer -o composer-setup.php
Or
$ php -r "copy('https://getcomposer.org/installer', 'composer-setup.php');"
Outputs:
root@devops:~# curl -sS https://getcomposer.org/installer -o composer-setup.php
root@devops:~# ls
composer-setup.php

root@devops:~# php -r "copy('https://getcomposer.org/installer', 'composer-setup.php');"
root@devops:~# ls
composer-setup.php
From the above outputs, you can see that the installer file has been downloaded to the local disk on the current directory.
#4 you need to verify the data integrity of the installer file if it matchs the SHA-384 hash for the latest installer Signature (SHA-384) found on the Composer Public keys/ Signatures page.
So you can get the latest installer Signature as:
48e3236262b34d30969dca3c37281b3b4bbe3221bda826ac6a9a62d6444cdb0dcd0615698a5cbe587c3f0fe57a54d8f5
Then you can run the following command to check the data integrity of the downloaded installer file:
$ php -r "if (hash_file('sha384', 'composer-setup.php') === '48e3236262b34d30969dca3c37281b3b4bbe3221bda826ac6a9a62d6444cdb0dcd0615698a5cbe587c3f0fe57a54d8f5') { echo 'Installer verified'; } else { echo 'Installer corrupt'; unlink('composer-setup.php'); } echo PHP_EOL;"
Outputs:
root@devops:~# php -r "if (hash_file('sha384', 'composer-setup.php') === '48e3236262b34d30969dca3c37281b3b4bbe3221bda826ac6a9a62d6444cdb0dcd0615698a5cbe587c3f0fe57a54d8f5') { echo 'Installer verified'; } else { echo 'Installer corrupt'; unlink('composer-setup.php'); } echo PHP_EOL;"
Installer verified
Note: if you get output as “Installer verified“, it indicates that the installer file can be used. And if you get “Installer corrupt“, you need to re-download the installer file and check the Installer Signature again.
#5 you need to run the Composer installer file to install Composer in a specified directory, and if you want to install Composer globally, just specify the install directory as /usr/local/bin, type the following command:
$ sudo php composer-setup.php --install-dir=/usr/local/bin --filename=composer
Outputs:
root@devops:~# sudo php composer-setup.php --install-dir=/usr/local/bin --filename=composer
All settings correct for using Composer
Downloading...

Composer (version 1.8.4) successfully installed to: /usr/local/bin/composer
Use it: php /usr/local/bin/composer
#6 after installed composer on your system, you can type composer command in the terminal, and you will get the composer version details along with options available with composer command:
$ composer
Outputs:
devops@devops:~$ composer
______
/ ____/___ ____ ___ ____ ____ ________ _____
/ / / __ \/ __ `__ \/ __ \/ __ \/ ___/ _ \/ ___/
/ /___/ /_/ / / / / / / /_/ / /_/ (__ ) __/ /
\____/\____/_/ /_/ /_/ .___/\____/____/\___/_/
/_/
Composer version 1.8.4 2019-02-11 10:52:10

Usage:
command [options] [arguments]

Options:
-h, --help Display this help message
-q, --quiet Do not output any message
-V, --version Display this application version
--ansi Force ANSI output
--no-ansi Disable ANSI output
-n, --no-interaction Do not ask any interactive question
--profile Display timing and memory usage information
--no-plugins Whether to disable plugins.
-d, --working-dir=WORKING-DIR If specified, use the given directory as working directory.
-v|vv|vvv, --verbose Increase the verbosity of messages: 1 for normal output, 2 for more verbose output and 3 for debug
Note: If you want to install Composer locally, and you can run the installer script in your project directory only. And the Installer will check a few PHP settings and then download composer.phar file to your working directory. This file is the Composer binary. It is a PHAR (PHP archive), which is an archive format for PHP which can be run on the command line, amongst other things. then you can run php composer.phar command to run Composer.
Installing Dependencies using Composer
After installed Composer on your Ubuntu system, you can start to use it to install dependencies for your PHP project. Here are the steps to install a external dependency called egulias/email-validator:
#1 You need to create a directory for your PHP project, and change the current directory to it, type:
$ mkdir emailproject
$ cd emailproject
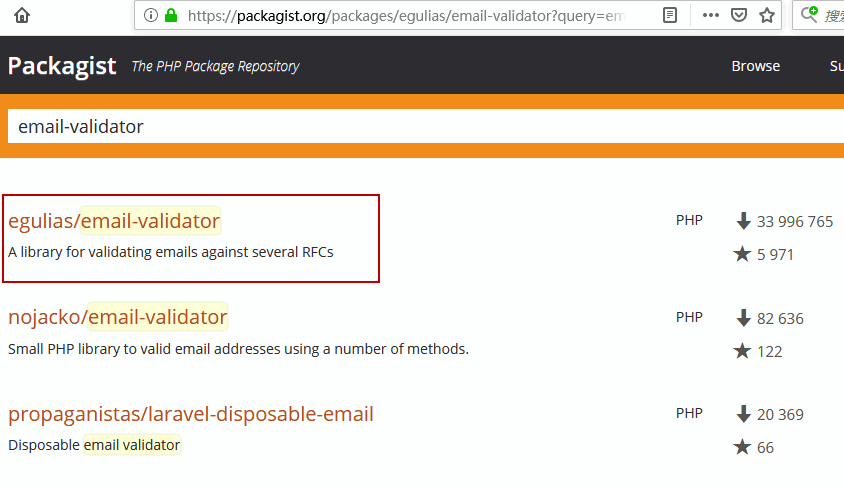
#2 you can search for email-validator package from the PHP Package Repository site to get the namespace of your package. Each package has unique identifier, and it contains two parts vendor name and package name.
 #3 Now you should know exactly which package you want to install for your PHP project, then run composer require command to download and install this package, type:
$ composer require egulias/email-validator
Outputs:
devops@devops:~/emailproject$ composer require egulias/email-validator
Using version ^2.1 for egulias/email-validator
./composer.json has been created
Loading composer repositories with package information
Updating dependencies (including require-dev)
Package operations: 2 installs, 0 updates, 0 removals
- Installing doctrine/lexer (v1.0.1): Downloading (100%)
- Installing egulias/email-validator (2.1.7): Downloading (100%)
egulias/email-validator suggests installing ext-intl (PHP Internationalization Libraries are required to use the SpoofChecking validation)
Writing lock file
Generating autoload files
From the above outputs, you can see that Composer created one file named composer.json, and download and install email-validator and all its dependencies. It also created a file called composer.lock and a directory called vendor.
Let’s list all files in your project directory, type:
$ ls -l
Outputs:
devops@devops:~/emailproject$ ls -l
total 16
-rw-rw-r-- 1 devops devops 69 Mar 13 23:11 composer.json
-rw-rw-r-- 1 devops devops 4462 Mar 13 23:12 composer.lock
drwxrwxr-x 5 devops devops 4096 Mar 13 23:12 vendor
Note: the composer.json file describes the dependencies of your project and may contain other metadata as well. The Composer.lock file contain a list of all installed packages and the exact versions of them that it downloaded to this file, locking the project to those specific versions. The vendor directory used to store all files of the downloaded dependency packages.
Updating Dependencies using Composer
The composer.lock file will prevent you to get the latest version of your dependency packages in your project, and if you want to update to the latest versions, you can use update command, it will fetch the latest matching versions according to your composer.json file, and then update the composer.lock file with the new version, type:
$ composer update
Outputs:
devops@devops:~/emailproject$ composer update
Loading composer repositories with package information
Updating dependencies (including require-dev)
Nothing to install or update
Generating autoload files
Autoloading Libraies
Composer provides an autoload script that you can simply include this file and start using the classes that those libraries provide without any extra work. So you just need to include the /vendor/autoload.php file (this file is generated by Composer automatically) in your PHP scripts.
Let’s create a php file called emailcheck.php to autoload Egulias/email-validator dependency to check a email address, add the following code into file emailcheck.php:
<?php
require __DIR__ . '/vendor/autoload.php';
use Egulias\EmailValidator\EmailValidator;
use Egulias\EmailValidator\Validation\RFCValidation;

$validator = new EmailValidator();
echo $validator->isValid("example@example.com", new RFCValidation()); //true
Save and close the file.
Then run it using php command, type:
$ php emailcheck.php
Outputs:
devops@devops:~/emailproject$ php emailcheck.php
1
Conclusion
You should know that how to install PHP Composer on Ubuntu 16.04 or 18.04 from this guide, and you also know how to install dependency packages for a PHP project using Composer on Ubuntu Linux server. If you want to see more information about Composer, you can go the official web site of Composer directly.