How to Install and Use LXD Container on Ubuntu 16.04 or 18.04 Linux
This post will guide you how to install and use LXD container to create your first Virtual Machine on your Ubuntu Linux 18.04 or 16.04. How do I setup and launch a LXD Container on ubuntu system.
- What is LXD Container?
- Requirements
- Step1: Installing LXD Container
- Step2: Installing ZFS Tools
- Step3: Setting Up LXD Container
- Step4: Launching LXD Container
- Step5: Managing LXD Container

What is LXD Container?
LXD is a next generation system container manager. It offers a user experience similar to virtual machines but using Linux containers instead. It’s image based with pre-made images available for a wide number of Linux distributions and is built around a very powerful, yet pretty simple, REST API.
LXD is a Container hypervisor providing a REST API to mange LXC containers under you Linux system. LXD is an enhancement of the LXC Container hypervisor, it support for cross-host container and image transfer.
Requirements
- You need to have a non-root user with sudo privileges so that you can install necessary packages on your Ubuntu system.
- You need to have an Ubuntu 16.04 or 18.04 installation and also can connect to internet for downloading imaging files.
- The host can be either a physical or virtual machine.
Step1: Installing LXD Container
The LXD package is already available in the default Ubuntu APT repository. So you can directly install it with the APT command. Just issue the below simple command to install it:
$ sudo apt update
$ sudo apt install lxd
Outputs:
root@devops:/home/devops# apt install lxd
Reading package lists... Done
Building dependency tree
Reading state information... Done
The following additional packages will be installed:
ebtables liblxc-common liblxc1 libuv1 lxcfs lxd-client uidmap xdelta3
Suggested packages:
criu lxd-tools
The following NEW packages will be installed:
ebtables liblxc-common liblxc1 libuv1 lxcfs lxd lxd-client uidmap xdelta3
0 upgraded, 9 newly installed, 0 to remove and 64 not upgraded.
Need to get 9,246 kB of archives.
After this operation, 35.2 MB of additional disk space will be used.
Do you want to continue? [Y/n] Y
Get:1 http://mirrors.aliyun.com/ubuntu bionic-updates/main amd64 ebtables amd64 2.0.10.4-3.5ubuntu2.18.04.3 [79.9 kB]
Get:2 http://mirrors.aliyun.com/ubuntu bionic-updates/main amd64 liblxc1 amd64 3.0.3-0ubuntu1~18.04.1 [264 kB]
Get:3 http://mirrors.aliyun.com/ubuntu bionic-updates/main amd64 liblxc-common amd64 3.0.3-0ubuntu1~18.04.1 [438 kB]
Get:4 http://mirrors.aliyun.com/ubuntu bionic/main amd64 libuv1 amd64 1.18.0-3 [64.4 kB]
Get:5 http://mirrors.aliyun.com/ubuntu bionic-updates/main amd64 lxcfs amd64 3.0.3-0ubuntu1~18.04.1 [38.9 kB]
Get:6 http://mirrors.aliyun.com/ubuntu bionic-updates/main amd64 lxd-client amd64 3.0.3-0ubuntu1~18.04.1 [3,027 kB]
Get:7 http://mirrors.aliyun.com/ubuntu bionic-updates/main amd64 uidmap amd64 1:4.5-1ubuntu2 [65.7 kB]
Get:8 http://mirrors.aliyun.com/ubuntu bionic/main amd64 xdelta3 amd64 3.0.11-dfsg-1ubuntu1 [68.9 kB]
Get:9 http://mirrors.aliyun.com/ubuntu bionic-updates/main amd64 lxd amd64 3.0.3-0ubuntu1~18.04.1 [5,199 kB]
Fetched 9,246 kB in 1s (6,359 kB/s)
Selecting previously unselected package ebtables.
(Reading database ... 174925 files and directories currently installed.)
Preparing to unpack .../0-ebtables_2.0.10.4-3.5ubuntu2.18.04.3_amd64.deb ...
Unpacking ebtables (2.0.10.4-3.5ubuntu2.18.04.3) ...
Selecting previously unselected package liblxc1.
Preparing to unpack .../1-liblxc1_3.0.3-0ubuntu1~18.04.1_amd64.deb ...
Unpacking liblxc1 (3.0.3-0ubuntu1~18.04.1) ...
Selecting previously unselected package liblxc-common.
Preparing to unpack .../2-liblxc-common_3.0.3-0ubuntu1~18.04.1_amd64.deb ...
Unpacking liblxc-common (3.0.3-0ubuntu1~18.04.1) ...
Selecting previously unselected package libuv1:amd64.
Preparing to unpack .../3-libuv1_1.18.0-3_amd64.deb ...
Unpacking libuv1:amd64 (1.18.0-3) ...
Selecting previously unselected package lxcfs.
Preparing to unpack .../4-lxcfs_3.0.3-0ubuntu1~18.04.1_amd64.deb ...
Unpacking lxcfs (3.0.3-0ubuntu1~18.04.1) ...
Selecting previously unselected package lxd-client.
Preparing to unpack .../5-lxd-client_3.0.3-0ubuntu1~18.04.1_amd64.deb ...
Unpacking lxd-client (3.0.3-0ubuntu1~18.04.1) ...
Selecting previously unselected package uidmap.
Preparing to unpack .../6-uidmap_1%3a4.5-1ubuntu2_amd64.deb ...
Unpacking uidmap (1:4.5-1ubuntu2) ...
Selecting previously unselected package xdelta3.
Preparing to unpack .../7-xdelta3_3.0.11-dfsg-1ubuntu1_amd64.deb ...
Unpacking xdelta3 (3.0.11-dfsg-1ubuntu1) ...
Selecting previously unselected package lxd.
Preparing to unpack .../8-lxd_3.0.3-0ubuntu1~18.04.1_amd64.deb ...
Adding system user `lxd' (UID 124) ...
Adding new user `lxd' (UID 124) with group `nogroup' ...
Creating home directory `/var/lib/lxd/' ...
Adding group `lxd' (GID 128) ...
Done.
Unpacking lxd (3.0.3-0ubuntu1~18.04.1) ...
Processing triggers for ureadahead (0.100.0-21) ...
Setting up libuv1:amd64 (1.18.0-3) ...
Setting up uidmap (1:4.5-1ubuntu2) ...
Setting up lxd-client (3.0.3-0ubuntu1~18.04.1) ...
Processing triggers for libc-bin (2.27-3ubuntu1) ...
Processing triggers for systemd (237-3ubuntu10.23) ...
Setting up ebtables (2.0.10.4-3.5ubuntu2.18.04.3) ...######################################..............................]
Created symlink /etc/systemd/system/multi-user.target.wants/ebtables.service → /lib/systemd/system/ebtables.service.
update-rc.d: warning: start and stop actions are no longer supported; falling back to defaults
Setting up lxcfs (3.0.3-0ubuntu1~18.04.1) ...
Created symlink /etc/systemd/system/multi-user.target.wants/lxcfs.service → /lib/systemd/system/lxcfs.service.
Processing triggers for man-db (2.8.3-2ubuntu0.1) ...
Setting up xdelta3 (3.0.11-dfsg-1ubuntu1) ...
Setting up liblxc1 (3.0.3-0ubuntu1~18.04.1) ...
Setting up liblxc-common (3.0.3-0ubuntu1~18.04.1) ...
Setting up lxd (3.0.3-0ubuntu1~18.04.1) ...
Created symlink /etc/systemd/system/multi-user.target.wants/lxd-containers.service → /lib/systemd/system/lxd-containers.service.
Created symlink /etc/systemd/system/sockets.target.wants/lxd.socket → /lib/systemd/system/lxd.socket.
Setting up lxd dnsmasq configuration.
To go through the initial LXD configuration, run: lxd init
Processing triggers for systemd (237-3ubuntu10.23) ...
Processing triggers for ureadahead (0.100.0-21) ...
Processing triggers for libc-bin (2.27-3ubuntu1) ...
Step2: Installing ZFS Tools
You can setup LXD using ZFS storage backend. And this file system can provide a copy-on-write functionality and it allow you to use the advanced LXD features, like disk quotas, instant container creation from an image, etc.
To install ZFS tools, just issue the following command in terminal:
$ sudo apt install zfsutils-linux
Outputs:
root@devops:/home/devops# sudo apt install zfsutils-linux
Reading package lists... Done
Building dependency tree
Reading state information... Done
The following additional packages will be installed:
libnvpair1linux libuutil1linux libzfs2linux libzpool2linux zfs-zed
Suggested packages:
nfs-kernel-server samba-common-bin zfs-initramfs | zfs-dracut
The following NEW packages will be installed:
libnvpair1linux libuutil1linux libzfs2linux libzpool2linux zfs-zed zfsutils-linux
0 upgraded, 6 newly installed, 0 to remove and 64 not upgraded.
Need to get 1,168 kB of archives.
After this operation, 4,259 kB of additional disk space will be used.
Do you want to continue? [Y/n] y
……
zfs-import-scan.service is a disabled or a static unit, not starting it.
Setting up zfs-zed (0.7.5-1ubuntu16.6) ...
Created symlink /etc/systemd/system/zed.service → /lib/systemd/system/zfs-zed.service.
Created symlink /etc/systemd/system/zfs.target.wants/zfs-zed.service → /lib/systemd/system/zfs-zed.service.
Processing triggers for libc-bin (2.27-3ubuntu1) ...
Step3: Setting Up LXD Container
Once LXD package is installed successfully on your system, you can proceed to setup the LXD daemon. It will also set up both storage and networking options, just run the below command:
$ sudo lxd init
Outputs:
root@devops:/home/devops# lxd init

Would you like to use LXD clustering? (yes/no) [default=no]:
Do you want to configure a new storage pool? (yes/no) [default=yes]:
Name of the new storage pool [default=default]: LxdDirectory
Would you like to connect to a MAAS server? (yes/no) [default=no]:
Would you like to create a new local network bridge? (yes/no) [default=yes]:
What should the new bridge be called? [default=lxdbr0]:
What IPv4 address should be used? (CIDR subnet notation, “auto” or “none”) [default=auto]:
What IPv6 address should be used? (CIDR subnet notation, “auto” or “none”) [default=auto]:
Would you like LXD to be available over the network? (yes/no) [default=no]:
Would you like stale cached images to be updated automatically? (yes/no) [default=yes]
Would you like a YAML "lxd init" preseed to be printed? (yes/no) [default=no]:
Note: it will ask a series of questions on how to configure the LXD daemon.
Once installed on your Ubuntu system, you need to make sure that your current user is part of the lxd group.
For example, if you current logging user is devops, you need to add this user to lxd group so that this user can access the LXD daemon locally. If not, just type the following command:
$ sudo adduser devops lxd
The new group will be effective at the next login session, to apply it to the current shell, you still need to run the following command for lxd group:
$ newgrp lxd
Step4: Launching LXD Container
Now you can start to use the LXD to create your first LXD container.
Firstly, you need to check if the client can connect to the LXD daemon with the following command:
$ lxc list
Outputs:
root@devops:/home/devops# lxc list
+------+-------+------+------+------+-----------+
| NAME | STATE | IPV4 | IPV6 | TYPE | SNAPSHOTS |
+------+-------+------+------+------+-----------+
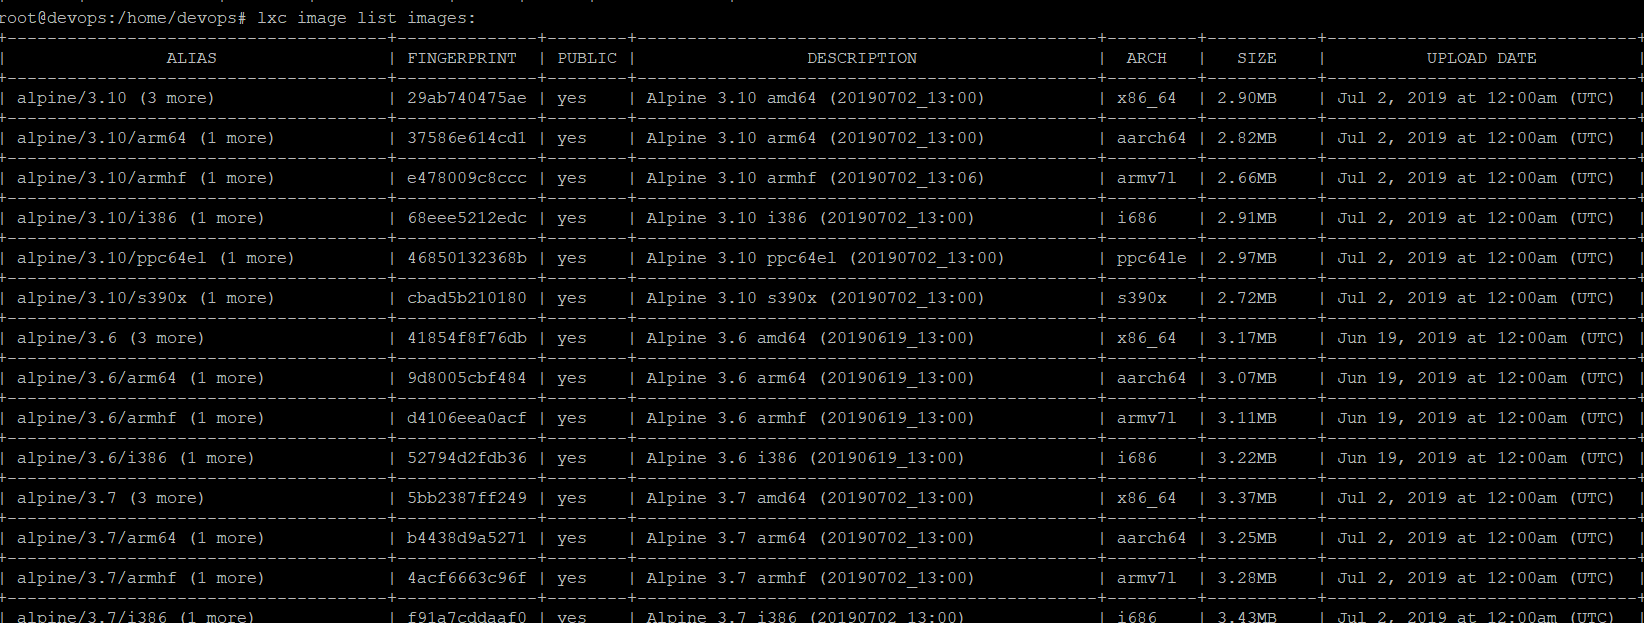
Before launching LXD Container, you can list all available images from remote server, just type:
$ lxc image list iamges:
This command will list all images that you can use, see below screenshot.
Assuming that you want to launch you first Alpine Linux system in LXD container, just use the following command:
$ lxc launch images:alpine/3.9 myalpineContainer
Outputs:
devops@devops:~$ lxc launch images:alpine/3.9  myalpineContainer
Creating myalpineContainer
Starting myalpineContainer
Note: alpine/3.9 is the image name and myalpineContainer is your container name. If you do not provide the container name, it will generate a random name.
This command will download the official Alpine 3.9 x86_64 image and then launch it.
List All Existing LXD Containers
If you want to list all existing LXD containers in your Ubuntu server, just use the following command:
$ lxc list
Outputs:
devops@devops:~$ lxc list
+-------------------+---------+----------------------+-----------------------------------------------+------------+-----------+
|       NAME        |  STATE  |         IPV4         |                     IPV6                      |    TYPE    | SNAPSHOTS |
+-------------------+---------+----------------------+-----------------------------------------------+------------+-----------+
| myalpineContainer | RUNNING | 10.128.138.16 (eth0) | fd42:841b:d3e7:7c96:216:3eff:fe5d:887c (eth0) | PERSISTENT | 0         |
+-------------------+---------+----------------------+-----------------------------------------------+------------+-----------+
Step5: Managing LXD Container
Executing command in the Container
If you want to execute commands in the specified container, you can use lxc exec command on your Ubuntu server.
For example, you want to execute “ls -a /” command on your first CentOS container, just issue the following command:
$ lxc exec myalpineContainer – ls -la /
Outputs:
devops@devops:~$ lxc exec myalpineContainer -- ls -la /
total 60
drwxr-xr-x   19 root     root          4096 Jul  2 13:00 .
drwxr-xr-x   19 root     root          4096 Jul  2 13:00 ..
drwxr-xr-x    2 root     root          4096 Jul  2 13:00 bin
drwxr-xr-x    7 root     root           420 Jul  3 13:36 dev
drwxr-xr-x   19 root     root          4096 Jul  3 13:36 etc
drwxr-xr-x    2 root     root          4096 Jan 29 20:53 home
drwxr-xr-x    6 root     root          4096 Jul  2 13:00 lib
Login and Get Bash Shell in a Specified Container
If you want to login and get a sh shell from a given LXD container, just run:
$ lxc exec myalpineContainer sh
Then you run Linux command on your CentOS container, such as:
$ ifconfig
$  hostname
outputs:
devops@devops:~$ sudo lxc exec myalpineContainer sh
~ # hostname
myalpineContainer
~ # ifconfig
eth0      Link encap:Ethernet  HWaddr 00:16:3E:5D:88:7C
inet addr:10.128.138.16  Bcast:10.128.138.255  Mask:255.255.255.0
inet6 addr: fd42:841b:d3e7:7c96:216:3eff:fe5d:887c/64 Scope:Global
inet6 addr: fe80::216:3eff:fe5d:887c/64 Scope:Link
UP BROADCAST RUNNING MULTICAST  MTU:1500  Metric:1
RX packets:54 errors:0 dropped:0 overruns:0 frame:0
TX packets:16 errors:0 dropped:0 overruns:0 carrier:0
collisions:0 txqueuelen:1000
RX bytes:7054 (6.8 KiB)  TX bytes:2079 (2.0 KiB)

lo        Link encap:Local Loopback
inet addr:127.0.0.1  Mask:255.0.0.0
inet6 addr: ::1/128 Scope:Host
UP LOOPBACK RUNNING  MTU:65536  Metric:1
RX packets:0 errors:0 dropped:0 overruns:0 frame:0
TX packets:0 errors:0 dropped:0 overruns:0 carrier:0
collisions:0 txqueuelen:1000
RX bytes:0 (0.0 B)  TX bytes:0 (0.0 B)
Stop LXD Container
If you want to stop a running LXD Container, just type:
$ lxc stop myalpineContainer
Start LXD Container
If you want to start a stopped LXD Container, just type:
$ lxc start myalpineContainer
Restart LXD Container
If you want to restart you running containers, just type:
$ lxc restart myalpineContainer
Delete LXD Container
If you want to delete an unwanted LXD container from your system, just type:
$ lxc delete myalpineContainer
Get Information of a LXD Container
If you want to get more detailed information about a given LXD container, such as: IP address, Memory usage, Network Usage, etc. just type:
$ lxc info myalpineContainer
Outputs:
devops@devops:~$ lxc info myalpineContainer
Name: myalpineContainer
Remote: unix://
Architecture: x86_64
Created: 2019/07/03 13:36 UTC
Status: Running
Type: persistent
Profiles: default
Pid: 5822
Ips:
  eth0: inet    10.128.138.16   vethTDVTP0
  eth0: inet6   fd42:841b:d3e7:7c96:216:3eff:fe5d:887c  vethTDVTP0
  eth0: inet6   fe80::216:3eff:fe5d:887c        vethTDVTP0
  lo:   inet    127.0.0.1
  lo:   inet6   ::1
Resources:
  Processes: 5
  CPU usage:
    CPU usage (in seconds): 0
  Memory usage:
    Memory (current): 1.55MB
    Memory (peak): 3.73MB
  Network usage:
    eth0:
      Bytes received: 7.37kB
      Bytes sent: 2.08kB
      Packets received: 57
      Packets sent: 16
    lo:
      Bytes received: 0B
      Bytes sent: 0B
      Packets received: 0
      Packets sent: 0
Conclusion
You should know that how to install and use LXD to create your first Container on your Ubuntu or Debian Linux. If you want to see more detailed information about LXD, you can directly go to its official web site.